These are some of our favourite tools to have nearby when creating pyrography projects of any kind. These are tools that are not necessarily essential, but sure feel essential to me. They make the task at hand easier, faster or simply just more convenient.
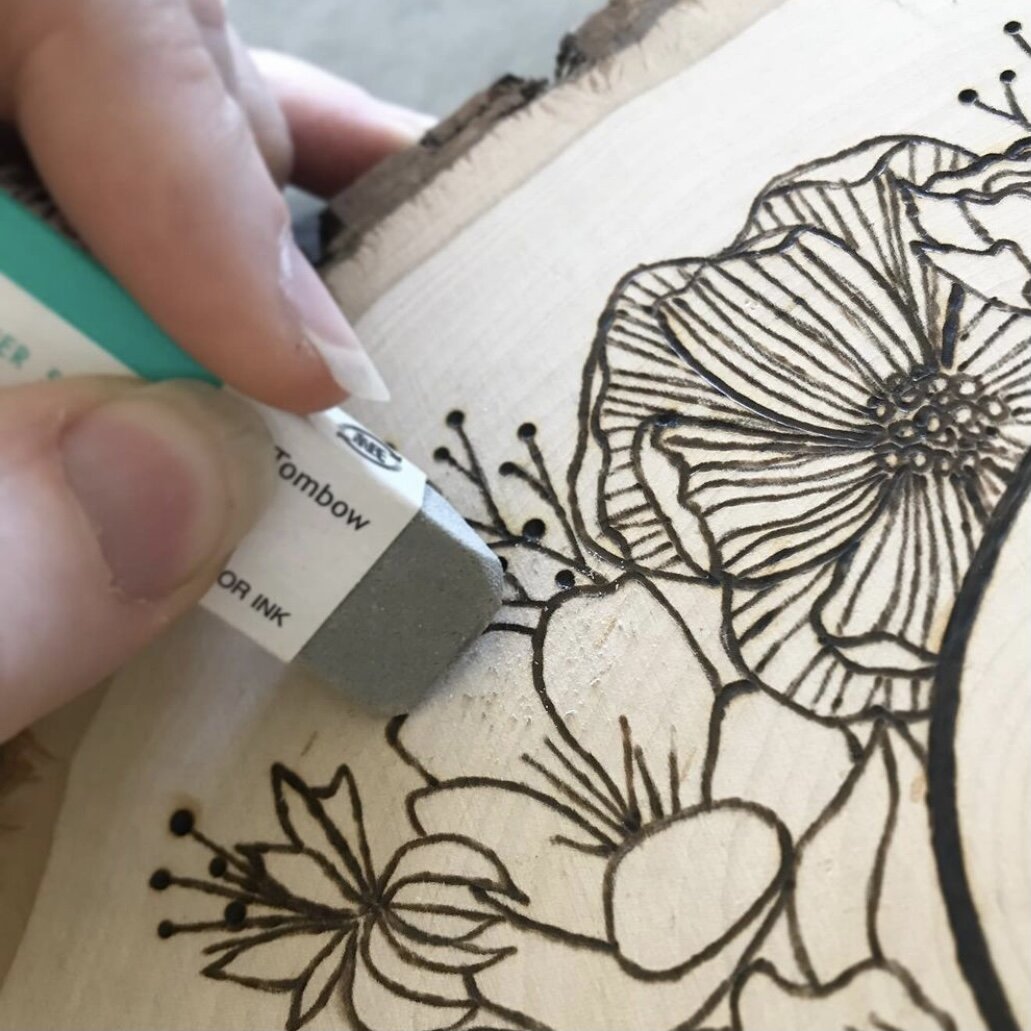
This is THE BEST tool that I have found to get rid of unwanted graphite markings. I first discovered this when I saw an ink artist using the eraser, and saw that it was called a “sand eraser,” so I wondered if it would work on wood, and it did! Now I see this eraser being using widely amongst pyros, and it makes me so happy I decided to experiment that day.

This saves so much time with watercolor/gouache/acrylic. Instead of having to dip back in water, the water is held in the pen. It’s brilliant!!! It’s easy to adjust the amount of water too which is key to painting on wood. Too much water can split it… Always remember to burn first, and then add your color. CLICK HERE for more water-colour on wood tips.

This is my go-to, must-have tool next to me while I burn. I use it to quickly and gently scrape away any char on my nib so I can keep a nice smooth burn. Some artists may think this is too harsh for their nibs, but I have had zero issues with scratching/damaging nibs with this technique. Look for something with softer bristles. Giving it a quick scrape keeps my lines clean and smooth. Highly recommend. CLICK HERE to learn more about maintaining and cleaning your tools.

Blue Chaco Paper
This stuff is a great alternative to graphite paper, and only requires a little damp cloth to wipe away. It’s a bit pricey, but worth it, and can be used over and over again just like graphite paper. You transfer it in the exact same way you do for a transfer or graphite paper, but any unwanted lines can be removed so much easier. (Check out How To Transfer Designs To Wood Without Using Heat).
Metal Ruler
Metal is key here, because you can use it to burn straight lines by cozying your burner right up next to the edge of the ruler. If you were to use plastic, you’d melt it, so be sure it is a metal ruler. It works really well to create nice straight lines, just be sure to hold it firmly in place and keep your fingers out of the way. Do not hold the ruler near where you are burning!

This is like having a magic eraser. Any over burned areas, or little mistakes you can gently chip them away with a razor blade and no one will ever know. Be careful though. Once. you chip it away, you won’t have a flat texture to burn on and the spot may be noticeable, especially if you go deep. Try gently scraping it first. On the other hand, getting the inverted texture is something you are looking for: it is great for creating fine hairs in detailed photorealistic pieces after you’ve burned it.
Needle Nose Pliers
This is so I can carefully change nibs while they are still warm. If you are impatient, like me, I suggest having a pair of these at the ready when you are burning. Also have a ceramic dish or glass jar/bowl to catch those hot nibs to go along with it. This is obviously not necessary, because you can always wait for your burner to cool before changing nibs by hand.
ceramic ring dish
This is where I ditch my hot nibs/tips when changing them out mid-burn. A glass or metal dish would work as well.

These sand paper pens/sticks are also great for those finer details, and little mistakes. No matter how good of a job I did on the burn, I can always tidy it up a bit with one of these bad boys. It only takes a little bit of time, but they clean up any piece to give it that polished look.

Wooden ball stylus dotting tool
I use this for transferring designs to wood (Check out How To Transfer Designs To Wood Without Using Heat). It allows me to use the same design over and over again.
Camera Holder (small and Large)
This is so I can film and photograph while I burn hands-free. It is much safer and creates better quality content.
I have one small holder that I attach to my desk for close ups. This is one I also take around with me because it is super portable and very very sturdy.
The larger one lives on my desk!
If you are a pyrographer that utilizes social media for marketing, then I can not recommend this enough. Hit that record button each time you sit down, and you will find yourself with so much great content that you can use.
What are your favorite odd tools for wood burning?
Check out this blog post for learning how to take care of all your wood burning tools.